
If you’ve been curious about canning pickles but worried they might turn out soft, cloudy, or just a little disappointing, I’m so glad you’re here. Water bath canning is one of my favorite ways to preserve cucumbers, and with a few smart habits, you can make pickles that stay crisp, bright, and full of that classic tangy flavor you want when you pop open a jar months later.
I’ve made enough batches over the years to learn that crunchy pickles are rarely about luck. They’re about choosing the right cucumbers, mixing a balanced brine, packing jars carefully, and processing them just long enough. This recipe walks you through a dependable dill-style pickle made for water bath canning, and I’ve woven in 12 practical tips that help protect texture and flavor from start to finish.
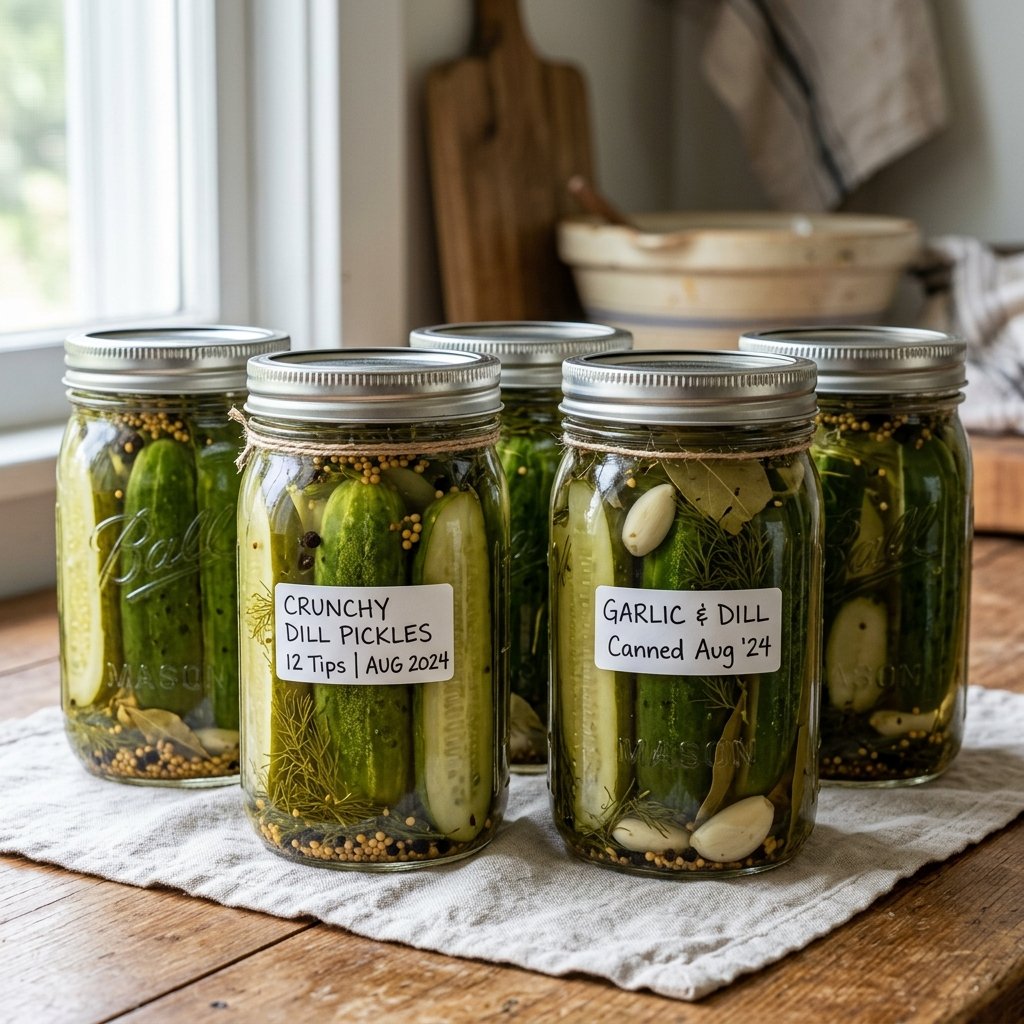
The image says exactly what this recipe feels like in real life: a line of mason jars filled with cucumber spears and slices in clear brine, with whole spices and bay leaves tucked inside. It’s rustic, useful, and genuinely satisfying. If you want a beginner-friendly method you can trust, I’ll show you how I do it so you can feel confident every step of the way.
Quick Recipe Info
| Prep time | 35 minutes |
| Cook time | 15 minutes |
| Total time | 50 minutes |
| Servings | 4 quart jars |
| Difficulty | Moderate |
Why You’ll Love It
- You get a clear, reliable water bath canning method that feels approachable even if you’re fairly new to preserving.
- The brine is bright, tangy, and well-balanced without overpowering the cucumber flavor.
- It includes 12 texture-saving tips that help your pickles stay crunchier.
- You can make spears or slices depending on how you like to snack and serve them.
- The spice profile is classic and flexible, so it’s easy to adjust the heat or dill level.
- A pantry shelf full of homemade pickles is one of the most satisfying kitchen wins I know.
Nutritional Benefits and Adaptable Variations
Nutritional Benefits
These pickles are a low-calorie condiment or snack with a lot of flavor for a small serving. Cucumbers naturally contribute a little fiber and small amounts of vitamins and minerals, while vinegar-based pickling keeps the finished jars bright and shelf-stable when processed correctly. Because canned pickles can be high in sodium, I think of them as a flavorful accent rather than an everyday large-portion side. As always, nutrition can vary depending on how much brine and seasoning ends up in each serving.
Adaptable Variations
If you like classic dill pickles, keep the garlic, dill seed, and peppercorns exactly as written. If you want a little warmth, add a pinch of red pepper flakes or a few thin slices of jalapeno to each jar. You can also use this same method for rounds instead of spears, though slightly thicker cuts usually hold their texture better. I don’t recommend reducing the vinegar or changing the vinegar strength, but you can adjust the dry spices within reason to suit your taste.
Ingredients
For the cucumbers
- 4 pounds pickling cucumbers, washed well
- 1 tablespoon pickling salt for an ice-water soak
- Ice water, enough to cover
For the brine
- 4 cups white vinegar, 5% acidity
- 4 cups water
- 1/4 cup pickling salt
For each jar
- 1 clove garlic, peeled
- 1 teaspoon dill seed
- 1/2 teaspoon black peppercorns
- 1/4 teaspoon mustard seeds
- 1 small bay leaf
- Optional: pinch of red pepper flakes
Step-by-Step Instructions
[INSERT PROCESS IMAGE HERE]
- Trim 1/16 inch from the blossom end of each cucumber, then cut into spears or thick slices. This is one of my favorite crunchy pickle tips because the blossom end contains enzymes that can soften the final texture.
- Place the cucumbers in a large bowl with ice water and 1 tablespoon pickling salt. Let them soak for 2 hours, then drain well. Tip number two: start with very fresh cucumbers and chill them quickly.
- Wash 4 quart jars, lids, and bands. Prepare a boiling water canner and keep the jars hot until you’re ready to fill them. Clean equipment and hot jars help everything move smoothly.
- In a nonreactive pot, combine the vinegar, water, and 1/4 cup pickling salt. Bring the brine just to a boil, stirring until the salt dissolves. Tip number three: use pickling salt and standard 5% acidity vinegar for dependable results.
- Add 1 garlic clove, 1 teaspoon dill seed, 1/2 teaspoon peppercorns, 1/4 teaspoon mustard seeds, and 1 bay leaf to each hot jar. If you want heat, add a small pinch of red pepper flakes.
- Pack the cucumbers firmly into the jars without crushing them. Tip number four: snug packing helps keep the pieces from floating too much, but don’t force them in so tightly that brine can’t circulate.
- Ladle hot brine over the cucumbers, leaving 1/2 inch headspace. Remove air bubbles with a nonmetallic utensil and adjust brine if needed. Tip number five: correct headspace matters for both sealing and texture.
- Wipe the jar rims with a clean damp cloth, apply the lids, and screw on the bands until fingertip tight. Tip number six: overtightening can interfere with proper venting during processing.
- Place the jars in the boiling water canner, making sure they’re covered by at least 1 inch of water. Bring back to a full boil and process for 15 minutes, adjusting for altitude if needed according to trusted canning guidance. Tip number seven: don’t under-process, but don’t process longer than necessary either.
- Turn off the heat, remove the canner lid, and let the jars rest in the water for 5 minutes. This brief settling time helps reduce siphoning. Tip number eight: avoid sudden temperature changes.
- Transfer the jars to a towel-lined surface and let them cool undisturbed for 12 to 24 hours. Tip number nine: don’t press the lids while they seal, and don’t retighten the bands.
- Check the seals, remove the bands, wipe the jars, and label them. Tip number ten: let the pickles cure for at least 1 to 2 weeks before opening for the best flavor. Tip number eleven: store sealed jars in a cool, dark place. Tip number twelve: refrigerate any unsealed jar and use it first.
Tips, Serving Suggestions & Substitutions
Best tip for crunchy pickles
Use very fresh, firm pickling cucumbers and always trim the blossom end before canning. If you do only one thing to improve texture, make it that.
Serving suggestions
These pickles are perfect with burgers, barbecue, sandwiches, charcuterie boards, potato salad, and simple lunch plates. I also love chopping them into egg salad or tuna salad for a bright, salty crunch.
Simple substitutions
You can switch from spears to thick rounds, replace dill seed with fresh dill heads if you have them, or add a little red pepper for heat. Keep the vinegar strength, salt type, and brine ratio the same for safe, reliable canning.
Nutrition Information
| Calories | 18 | Carbohydrates | 4 g |
| Protein | 1 g | Fat | 0 g |
| Saturated fat | 0 g | Cholesterol | 0 mg |
| Sodium | 390 mg | Fiber | 1 g |
| Sugar | 2 g | Serving size | About 1/2 cup |
Nutrition values are approximate estimates per serving and can vary with cucumber size, brine absorption, and exact yield.
Storage & Make-Ahead Tips
Before opening: Store sealed jars in a cool, dark, dry place for up to 1 year for best quality. For the best flavor, I like to wait at least 1 to 2 weeks before opening a jar.
After opening: Refrigerate the jar and keep the pickles submerged in brine. Use within 4 to 6 weeks for the best flavor and texture.
Make-ahead tip: You can wash and trim the cucumbers a few hours ahead, and you can also measure the spices in advance to make jar filling faster. I don’t recommend slicing the cucumbers too far ahead, because fresher cut surfaces usually mean better crunch.
FAQ
1. Why did my canned pickles turn out soft?
Soft pickles are usually caused by older cucumbers, leaving the blossom end on, overprocessing, or using a weak brine. Starting with very fresh pickling cucumbers makes a huge difference.
2. Can I use regular table salt?
I recommend pickling salt for the cleanest brine and most dependable results. Table salt can contain additives that make the brine cloudy and may affect flavor.
3. Do I have to use pickling cucumbers?
They’re the best choice because they have firmer flesh and thinner skins. You can use other small firm cucumbers, but the final texture may be less crisp and the jars may look less uniform.
4. When are the pickles ready to eat?
You can technically eat them once the jars are sealed and cooled, but the flavor improves a lot after at least 1 week. I think 2 weeks is even better for a fuller dill pickle taste.
5. What should I do if a jar doesn’t seal?
Refrigerate it as soon as it’s fully cool and use it first. If you want long-term shelf storage, follow a trusted canning source for guidance on whether the jar can be reprocessed safely within the proper time frame.
Final Thoughts
If you’ve been wanting a dependable method for water bath canning pickles, this is the kind of recipe I’d happily share across my own kitchen counter with a friend. It’s simple, practical, and built around the little details that make all the difference. If you try it, I’d love to hear how your jars turned out. Share the recipe with another pickle lover, leave a comment with your favorite spice variation, and save it to Pinterest for canning season.
Water Bath Canning Pickles: 12 Tips for Crunchy Pickles That Never Disappoint
Ingredients
Equipment
Method
- Trim 1/16 inch from the blossom end of each cucumber, then cut into spears or thick slices.
- Place the cucumbers in a large bowl with ice water and 1 tablespoon pickling salt. Let soak for 2 hours, then drain well.
- Wash 4 quart jars, lids, and bands. Prepare a boiling water canner and keep the jars hot until ready to fill.
- In a nonreactive pot, combine the vinegar, water, and 1/4 cup pickling salt. Bring just to a boil, stirring until the salt dissolves.
- Add 1 garlic clove, 1 teaspoon dill seed, 1/2 teaspoon peppercorns, 1/4 teaspoon mustard seeds, 1 bay leaf, and optional red pepper flakes to each hot jar.
- Pack the cucumbers firmly into the jars without crushing them.
- Ladle hot brine over the cucumbers, leaving 1/2 inch headspace. Remove air bubbles and adjust brine if needed.
- Wipe the jar rims, apply the lids, and screw on the bands until fingertip tight.
- Place the jars in the boiling water canner, making sure they are covered by at least 1 inch of water. Return to a full boil and process for 15 minutes, adjusting for altitude if needed.
- Turn off the heat, remove the canner lid, and let the jars rest in the water for 5 minutes.
- Transfer the jars to a towel-lined surface and let cool undisturbed for 12 to 24 hours.
- Check the seals, remove the bands, wipe the jars, and label them. Let the pickles cure for 1 to 2 weeks before opening for best flavor.