
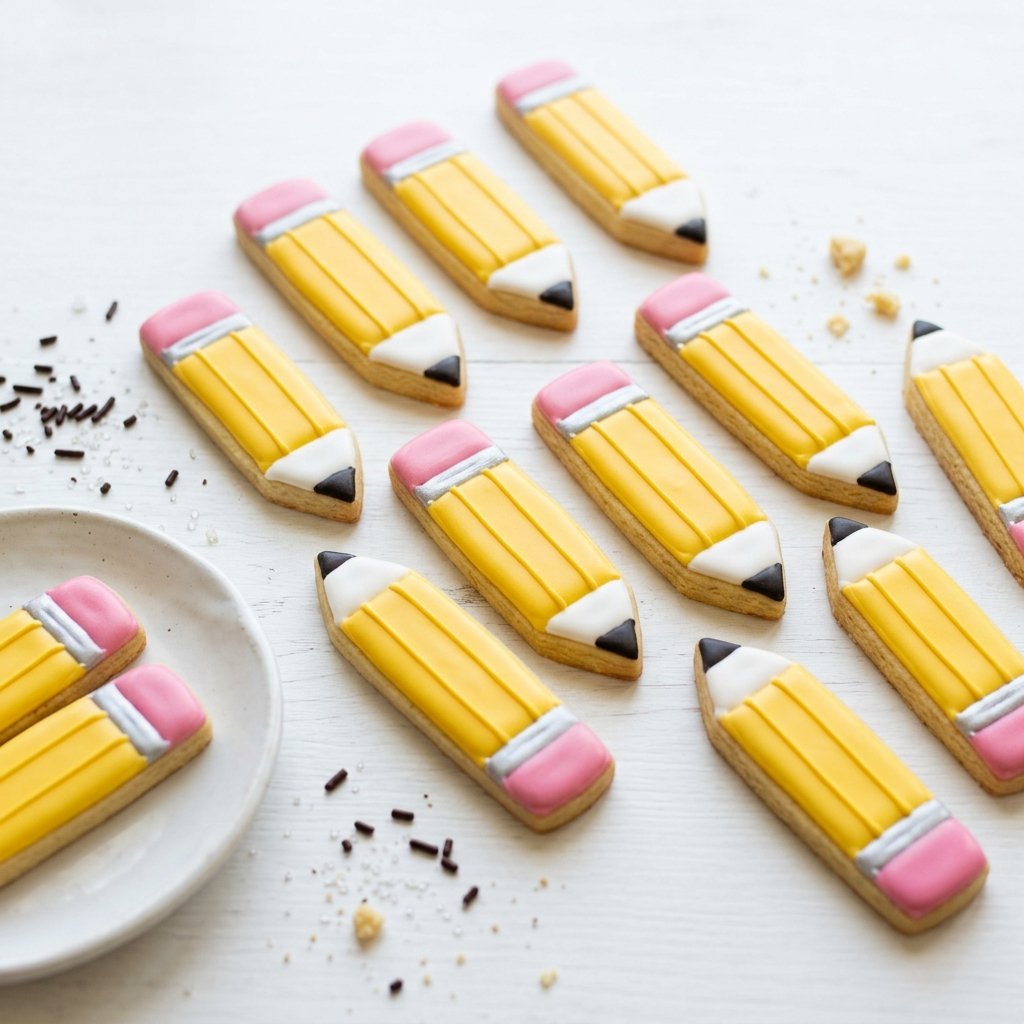
If you’re looking for cheerful back to school cookies that feel special without being complicated, these easy pencil sugar cookies are exactly the kind of treat I love to make. They’re bright, playful, and instantly recognizable, with a buttery vanilla cookie base decorated to look like classic yellow pencils with pink erasers and little pointed tips. They’re perfect for lunchbox surprises, class parties, teacher gifts, or a fun baking afternoon with kids before the school year begins.
I really like this recipe because it gives you that adorable themed-cookie look without requiring professional decorating skills. The dough is simple, reliable, and easy to work with, and the decorating is more approachable than it looks. Once you break the design into sections, it becomes a very manageable project that still delivers a big wow factor.
You can make these ahead, package them in little treat bags, or set them out on a dessert tray for a first-day-of-school celebration. If you’ve ever wanted a cute school-themed cookie recipe that still tastes genuinely delicious, I think you’ll come back to these again and again.
| Prep time | 30 minutes | Cook time | 10 minutes |
| Total time | 100 minutes | Servings | 18 cookies |
| Difficulty | Easy |
Why You’ll Love It
- The cookies are soft, buttery, and vanilla-scented, so they taste as good as they look.
- The pencil design is adorable for the first day of school, bake sales, and classroom celebrations.
- The dough holds its shape well, which makes cutting clean pencil outlines much easier.
- You can decorate them simply with tinted icing, even if you’re not an experienced cookie decorator.
- They’re easy to make ahead, package, and share.
- Kids can help with mixing, cutting, and decorating, which turns the recipe into a fun pre-school tradition.
Nutritional Benefits and Adaptable Variations
A sweet treat with simple ingredients
These cookies are definitely a dessert, but I still appreciate that they’re made from familiar baking basics like flour, butter, sugar, egg, and vanilla. When shared as part of a celebration or packed as an occasional treat, they’re a fun homemade option that can feel a little more personal than store-bought sweets. Portion size matters, and one cookie is usually enough to bring that festive back-to-school feeling.
Easy ways to make them your own
You can flavor the dough with a touch of almond extract if you like a bakery-style sugar cookie. If you prefer a crisper finish, roll the dough slightly thinner and bake a minute longer. For decorating, royal icing gives a smooth polished look, while a simple powdered sugar glaze is a little more relaxed and beginner-friendly. You can also swap the classic yellow-pencil style for school colors, metallic accents for teachers, or personalized initials for place settings and party favors.
Ingredients
For the sugar cookie dough
- 2 3/4 cups all-purpose flour
- 1 teaspoon baking powder
- 1/2 teaspoon salt
- 1 cup unsalted butter, softened
- 1 cup granulated sugar
- 1 large egg
- 2 teaspoons vanilla extract
For the icing and decoration
- 2 cups powdered sugar
- 3 to 4 tablespoons milk
- 1 tablespoon light corn syrup
- 1/2 teaspoon vanilla extract
- Yellow gel food coloring
- Pink gel food coloring
- Black gel food coloring or melted dark chocolate for the pencil point
- Extra powdered sugar or milk as needed to adjust icing consistency
Step-by-Step Instructions
[INSERT PROCESS IMAGE HERE]
- In a medium bowl, whisk together the flour, baking powder, and salt. Set the dry mixture aside so it’s ready to add later.
- In a large bowl, beat the softened butter and granulated sugar until light and creamy. Mix in the egg and vanilla until fully combined.
- Add the dry ingredients to the butter mixture and mix just until a soft dough forms. Don’t overmix, or the cookies can bake up less tender.
- Divide the dough into two portions, flatten each into a disk, wrap, and chill for at least 45 minutes. This helps the dough roll cleanly and keeps the pencil shapes neat in the oven.
- Preheat your oven to 350°F and line baking sheets with parchment paper. On a lightly floured surface, roll one portion of dough to about 1/4 inch thick.
- Cut the dough into long rectangles with one tapered end to resemble pencils. You can use a pencil-shaped cookie cutter or cut them by hand with a small knife. Transfer the shapes to the prepared baking sheets.
- Bake for 9 to 10 minutes, until the edges are just set and the tops look dry but not browned. Let the cookies cool on the baking sheet for 5 minutes, then move them to a wire rack to cool completely.
- To make the icing, whisk together the powdered sugar, 3 tablespoons milk, corn syrup, and vanilla until smooth. Add more milk a few drops at a time if needed for a spreadable consistency.
- Divide the icing into small bowls. Tint one bowl yellow, one pink, and leave a little plain white. Tint a tiny amount black, or use melted dark chocolate for the pencil lead tip.
- Decorate each cookie in sections: yellow across the main body, pink at the eraser end, white at the sharpened tip area, and a tiny black point at the very end. Let one section set briefly before adding the next if your icing is loose.
- Let the decorated cookies rest at room temperature until the icing is set before stacking or packaging. Depending on your icing consistency, this can take 30 minutes to 1 hour.
Tips, Serving Suggestions & Substitutions
Tips
The most important tip is to chill the dough well before rolling and cutting. That one step makes these cookies dramatically easier to shape and helps them keep crisp pencil edges while baking.
If the dough softens while you work, slide it back into the refrigerator for 10 to 15 minutes. For cleaner decoration, use a small spoon or piping bag and allow the icing to settle naturally instead of overworking it.
Serving Suggestions
I love serving these on a simple white platter for a first-day breakfast spread, tucked into lunchboxes, or wrapped individually for teachers and neighbors. They also look great arranged beside apples, popcorn, or mini cupcakes on a back-to-school dessert table.
Substitutions
You can use your favorite roll-out sugar cookie dough if you already have a trusted version. If you don’t want to use corn syrup in the icing, replace it with a little extra milk, knowing the shine may be slightly softer. Almond extract can replace part of the vanilla for a more classic bakery flavor, but use it sparingly so it doesn’t overpower the cookies.
Nutrition Information
| Calories | 182 | Carbohydrates | 27 g |
| Protein | 2 g | Fat | 8 g |
| Saturated Fat | 5 g | Sodium | 72 mg |
| Fiber | 0 g | Sugar | 16 g |
Nutrition values are approximate estimates per cookie and can vary based on icing amount and cookie size.
Storage & Make-Ahead Tips
Room temperature: Store the fully set cookies in an airtight container at room temperature for up to 5 days. Place parchment paper between layers if needed to protect the decoration.
Make ahead: The dough can be made up to 2 days in advance and kept chilled. You can also freeze the unbaked dough disks for up to 2 months; thaw overnight in the refrigerator before rolling.
Decorated cookies: If you’re packaging them for school events or gifts, make sure the icing is completely dry first. Keep them in a cool spot away from heat so the design stays neat.
FAQ
Can I make these back to school cookies without a pencil-shaped cutter?
Yes. I often recommend cutting simple long rectangles and trimming one end into a point with a small knife. It’s easy, and once decorated, they clearly look like pencils.
What kind of icing works best for beginners?
A simple powdered sugar icing like the one in this recipe is great for beginners because it mixes quickly and spreads easily. If you want sharper lines and a firmer finish, you can use royal icing instead.
How do I keep the cookies from spreading?
Chill the dough thoroughly, avoid over-softening the butter, and bake the cookies on parchment-lined sheets. If your cut shapes feel warm before baking, refrigerate the tray for 10 minutes first.
Can kids help decorate these?
Absolutely. I think this is one of the most fun parts of the recipe. Younger kids can help fill in the yellow and pink sections, while adults can handle the finer white tip and black pencil point details.
Can I freeze the finished cookies?
Yes, but freeze them only after the icing is fully set. Layer them carefully in an airtight container with parchment between layers. Thaw at room temperature before serving, and avoid condensation by keeping the container closed until thawed.
Final Thoughts
I love recipes like this because they bring so much personality to a simple homemade dessert. These pencil sugar cookies are sweet, nostalgic, and perfect for celebrating a fresh start to the school year. If you make them, I’d love to hear how they turned out for you. Feel free to leave a comment, share the recipe with a friend, or save it to Pinterest for your back-to-school baking plans.
Best Easy Pencil Sugar Cookies for First Day of School
Ingredients
Equipment
Method
- Whisk together the flour, baking powder, and salt in a medium bowl.
- In a large bowl, beat the softened butter and granulated sugar until light and creamy. Mix in the egg and vanilla until fully combined.
- Add the dry ingredients to the butter mixture and mix just until a soft dough forms.
- Divide the dough into 2 portions, flatten into disks, wrap, and chill for at least 45 minutes.
- Preheat the oven to 350°F and line baking sheets with parchment paper.
- Roll out 1 portion of dough on a lightly floured surface to about 1/4 inch thick.
- Cut into long pencil shapes with one tapered end and transfer to the prepared baking sheets.
- Bake for 9 to 10 minutes, until the edges are just set and the tops look dry but not browned.
- Cool on the baking sheet for 5 minutes, then transfer to a wire rack to cool completely.
- Whisk together the powdered sugar, 3 tablespoons milk, corn syrup, and vanilla until smooth. Add more milk a few drops at a time if needed for a spreadable consistency.
- Divide the icing into small bowls. Tint one yellow, one pink, leave one white, and tint a tiny amount black or use melted dark chocolate for the pencil lead tip.
- Decorate each cookie with yellow icing on the main body, pink icing at one end for the eraser, white icing at the sharpened tip, and a tiny black point at the very end.
- Let the icing set at room temperature for 30 minutes to 1 hour before stacking or packaging.