
Welcome to the World of Strawberry Shortcake Sushi Rolls!
Hey there, food lover! If you’re looking for a fun and creative dessert that’s bound to impress your friends (or just satisfy your sweet tooth), you’re in the right place! Today, I’m going to share an exciting recipe for Strawberry Shortcake Sushi Rolls. Yes, you heard that right—sushi, but with a sweet twist! This fusion of flavors and textures is perfect for any gathering or just a cozy night in. I just love how playful it is, and I can’t wait for you to try it!
Nutritional Benefits
Now, let’s talk about the good stuff! Strawberries are packed with vitamin C, fiber, and antioxidants. They are not only delicious but also great for your skin and heart health. Plus, using cream cheese adds a bit of protein to your dessert, and the sushi rice can be a fun way to get those carbs in a new format. Just remember, everything in moderation is key!
Adaptable Variations
- Vegan Options: You can swap the cream cheese for a vegan cream cheese alternative or even a coconut cream for a tropical twist!
- Gluten-Free Version: Instead of soy sauce for drizzling, use coconut aminos or a gluten-free sauce to complement the rolls without any gluten worries.
- Berry Mix: Feel free to mix up the fruits! Raspberries, blueberries, or even peaches can give a delicious twist to your rolls. Get creative!
Here’s How to Make Your Strawberry Shortcake Sushi Rolls!
Ingredients
- 1 cup sushi rice
- 1 ¼ cups water
- 2 tablespoons rice vinegar
- 1 tablespoon sugar
- A pinch of salt
- Nori sheets (seaweed)
- Fresh strawberries (sliced)
- 4 oz cream cheese (softened)
- Whipped cream (for topping)
- Graham cracker crumbs (for garnish)
- Strawberry sauce (for drizzling)
- Mint leaves (for garnish, optional)
Serves 4–6 people
Standard portions → 4 servings
Slightly smaller portions → up to 6 servings
Step-by-Step Instructions
- Prepare the Sushi Rice: First, rinse your sushi rice under cold water until the water runs clear. This helps to get rid of excess starch. Combine the rinsed rice with 1 ¼ cups of water in your rice cooker or pot. Cook it according to the rice cooker instructions, or bring to a boil, cover, and reduce to low heat for about 20 minutes until the rice is fluffy and cooked through.
- Season the Rice: In a small saucepan, heat up 2 tablespoons of rice vinegar, 1 tablespoon of sugar, and a pinch of salt until the sugar is completely dissolved. Once your rice is ready, transfer it to a large bowl and gently fold in the vinegar mixture. Let it cool down to room temperature — don’t rush this part; it makes the sushi so much better!
- Assemble the Sushi Rolls: Grab a bamboo sushi mat and place a sheet of nori on top, shiny side down. To prevent the rice from sticking to your hands, wet them! Take a fistful of your sushi rice and spread it over the nori, leaving about an inch of space at the top. Now, spread a layer of softened cream cheese right in the center and arrange some luscious strawberry slices on top.
- Roll the Sushi: Time to roll it up! Carefully lift the edge of the sushi mat closest to you and start rolling it away from you while pressing gently to keep it tight. Keep rolling until you reach the edge of the nori that’s exposed. Seal it with a little water so it stays put!
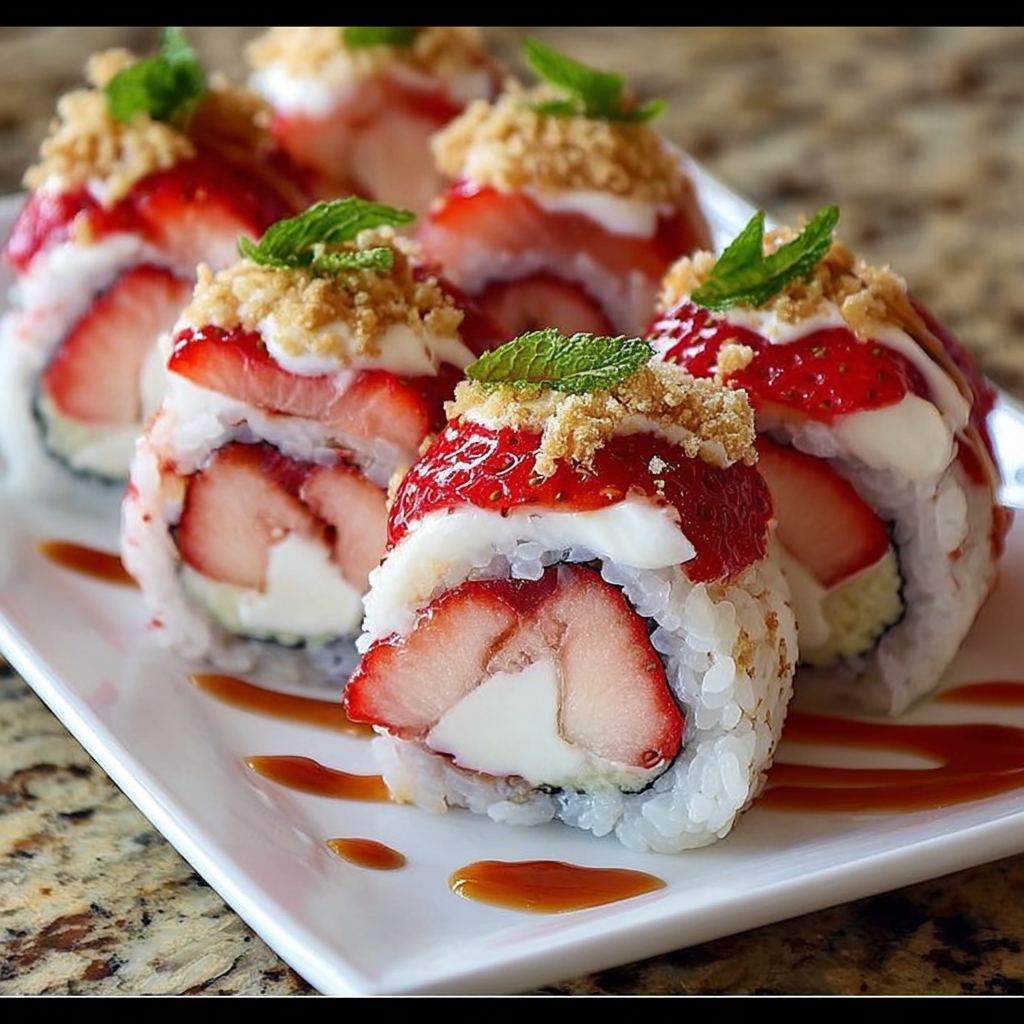
- Slice and Decorate the Rolls: Place your sushi roll upright on a serving plate. Drizzle it with strawberry sauce, add a dollop of whipped cream on each piece, and sprinkle some graham cracker crumbs for that delightful crunch!
- Garnish and Serve: For the final touch, place a fresh strawberry on top of each roll, and if you’re feeling fancy, add a mint leaf for a little pop of color. Serve those beauties immediately and get ready for some happy faces!
Practical & Valuable Tips
- If you want to keep your rolls fresh for a bit longer, store them in an airtight container in the fridge, and they’ll stay tasty for a day or so.
- Make sure not to overfill your rolls; it can make them difficult to roll and cut neatly.
- Wet your knife in between slicing to make sure your cuts are smooth and clean.
Equipment Needed
Here’s a quick list of the tools you’re going to need:
- A rice cooker or pot (for the sushi rice)
- A small saucepan (for seasoning the rice)
- A bamboo sushi mat (for rolling)
- A sharp knife (for slicing the rolls)
- A mixing bowl (for the rice)
- Measuring cups and spoons
Frequently Asked Questions
- Can I use regular rice instead of sushi rice? While you can, sushi rice has a sticky texture that helps hold the rolls together, so it’s best to stick with it if you can.
- Can I make these in advance? Definitely! You can prepare the rice and fillings ahead of time, but I suggest assembling them just before serving for freshness.
- How do I prevent the sushi rolls from falling apart? Rolling tightly is key! Make sure you seal the edge well with water, and don’t overstuff.
- What can I serve with these rolls? They pair beautifully with a scoop of ice cream or even a fruit salad for a refreshing contrast!
- Can I use frozen strawberries? Yes, you can! Just make sure to thaw and drain them first to avoid excess moisture in your rolls.
Let’s Get Rolling!
I hope you’re feeling inspired to try this unique dessert! Strawberry shortcake sushi rolls bring a smile to anyone’s face, and they’re just so fun to make. Remember to share your creations with me! If you enjoyed this recipe, be sure to check out my Pinterest for more delicious ideas that are easy and fun. Happy cooking!
