
Halloween Dessert Fun: Spooky, Easy, and Delicious Treats!
Hey there, Halloween lovers! 🎃 If you’re like me, just the thought of Halloween brings a wave of excitement—costumes, decorations, and of course, an endless array of fun treats to enjoy! Today, I’m excited to share a super simple and delicious Halloween dessert that will not only impress your guests but also make your taste buds sing! Say hello to these spooky layered treats that are as delightful to look at as they are to eat!
Why You’ll Love This Recipe
First off, no baking expertise is required here! This no-bake dessert is perfect if you want something sweet without heating up the kitchen. Plus, you can whip it up in no time while still achieving that “wow” factor. Packed with layers of creamy goodness, chocolate, and a touch of Halloween spirit, it’s a fun dessert for kids and adults alike!
Nutritional Benefits
Now, while this dessert is more about indulging your sweet tooth, there are a few things we can appreciate in moderation! For example, the cream cheese provides some calcium and protein, and if you add a bit of whipped cream, it can add a light, airy texture without overdoing it. The pudding mix can also be a source of calcium if you’re using milk! Try opting for lower-sugar versions if you want to make this treat somewhat healthier.
Adaptable Variations
- Halloween Fun: Swap the orange gelatin for other flavors like grape or lime to give it a fun twist, depending on your Halloween theme!
- Switch It Up: If you or your guests are gluten-free, you can look for gluten-free cookies or graham crackers as a substitute for the Oreo crust!
- Vegan Alternative: Use dairy-free cream cheese and whipped topping along with non-dairy pudding mixes to cater to those with dietary restrictions.
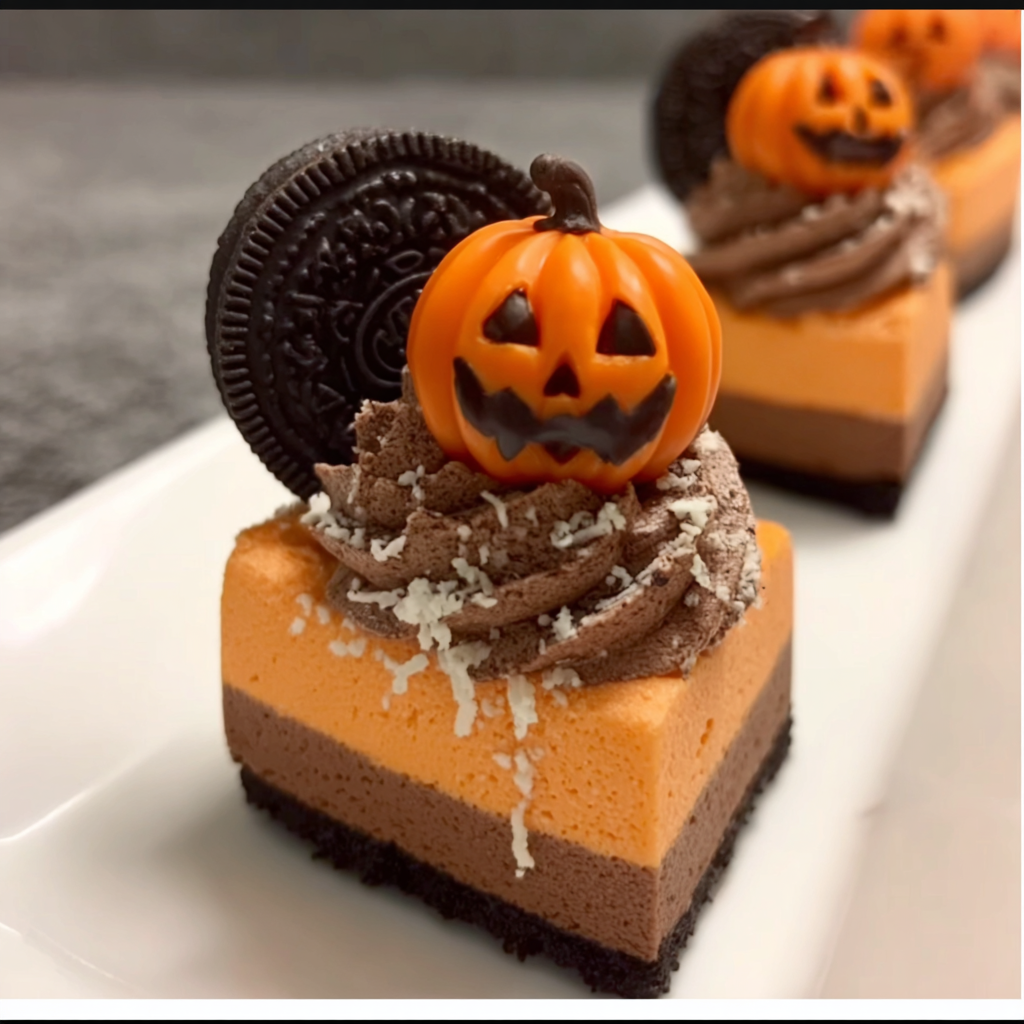
Spooky Layered Halloween Dessert Recipe
Ingredients
- 1 package of Oreo cookies (for the crust)
- 1/4 cup unsalted butter (melted)
- 1 package (8 oz.) cream cheese (softened)
- 1/2 cup powdered sugar
- 1 cup whipped cream (or whipped topping)
- 1 cup chocolate pudding mix (instant)
- 1 cup milk (for pudding)
- 1 cup orange gelatin (for the orange layer)
- 1 cup boiling water (for gelatin)
- 1/2 cup cold water (for gelatin)
- Halloween-themed chocolate or plastic pumpkin decorations
- Edible white sprinkles (to resemble spider webs)
- Cocoa powder (for dusting, optional)
Serves 6–8 people
Standard portions → 6 servings
Slightly smaller portions → up to 8 servings
Instructions
- First, preheat your oven to 350°F (175°C). This is just to bake the crust a little for that perfect crunch!
- Grab a food processor and crush those Oreo cookies into fine crumbs—a satisfying step if you ask me! Transfer them to a mixing bowl.
- Mix the melted butter into the Oreo crumbs until the mixture is fully combined.
- Next, press that mixture into the bottom of a 9×9-inch square baking dish—this is your delicious crust! Bake it for 10 minutes in that lovely preheated oven, then let it cool completely.
- While the crust is cooling, let’s get fun with the orange layer! Dissolve 1 cup of orange gelatin in 1 cup of boiling water in a mixing bowl. Stir until it’s fully dissolved, then add in the 1/2 cup of cold water. Set this aside to cool slightly.
- In another mixing bowl, whip your cream cheese and powdered sugar until it’s nice and smooth.
- Gently fold in 1/2 cup of whipped cream into that creamy mixture until you have a light and airy consistency. You’ll love how fluffy it is!
- Now, slowly add the cooled orange gelatin mixture into your cream cheese mixture, folding gently to preserve that uplifting texture.
- Pour this vibrant orange mixture over your cooled Oreo crust. Refrigerate it for at least 2 hours to allow it to set.
- Once the orange layer is nice and firm, let’s get our chocolate layer ready! In a separate bowl, whisk together the chocolate pudding mix with 1 cup of milk until it thickens up nicely.
- Fold in the remaining 1/2 cup of whipped cream into your pudding mixture; we’re making it luxuriously smooth here!
- Spread the chocolate layer evenly over the set orange layer in your baking dish. Tuck it back in the refrigerator for an additional hour, letting it set completely.
- When both layers are set, pipe extra whipped cream on top for decoration—make it fun and fluffy!
- Now, decorate each piece with those festive Halloween pumpkin figures and sprinkle edible white sprinkles over for that extra spooky flair!
- If you feel adventurous, dust with cocoa powder for a depth of flavor!
- Finally, cut into squares and serve chilled. Enjoy every spooky, delicious bite!
Practical Tips
- If you want to make cutting the dessert easier, let it chill overnight. It firms everything up nicely!
- Store leftovers in an airtight container in the refrigerator for up to 3 days, but trust me—these won’t last long!
- For an extra decorative touch, use themed cookie cutters to shape your whip cream decorations into ghosts or bats on top!
Frequently Asked Questions
- How do I know when the layers are set properly? You’ll know they’re set when they’re firm to the touch and not wobbly anymore. They should feel like a deliciously dense custard.
- Can I use a different kind of cookie for the crust? Definitely! You can use graham crackers or even chocolate chip cookies for a fun twist!
- Can I make this dessert a day in advance? Absolutely! In fact, it can be better since the flavors have more time to meld together.
- Can I freeze this dessert? I don’t recommend freezing it as the texture may change upon thawing. It’s best enjoyed straight from the fridge.
- What can I use instead of whipped cream? If you’re looking for a non-dairy alternative, coconut whipped cream works wonderfully here!
Time to Get Spooky!
And there you have it—a fun Halloween dessert that’s sure to impress your friends and family while satisfying that sweet craving. I can’t wait for you to try making these delightful treats! If you do, let me know how they turned out, and don’t forget to share your spooky creations on Pinterest! Happy Halloween baking! 🎉👻
