
Welcome to Oreo Stuffed Cinnamon Rolls!
Hey there, fellow cookie lovers! If you’re like me, then you probably have a soft spot for anything sweet and delicious. Today, I’m super excited to share a fun recipe that’s bound to become a family favorite: Oreo Stuffed Cinnamon Rolls. Imagine fluffy, warm cinnamon rolls filled with whole Oreo cookies and topped with a creamy glaze—what’s not to love? Grab your aprons, and let’s dive right into this delectable adventure!
Nutritional Benefits of This Treat
Now, I know cinnamon rolls aren’t exactly what you’d call health food, but they do come with some comforting qualities. Cinnamon is known for its antioxidant properties, and it can help with blood sugar control. Plus, using real ingredients means no preservatives—just good old-fashioned baking. And let’s be honest, indulging in something homemade brings happiness that no packaged treat can match!
Adaptable Variations to Consider
- Healthier Dough Options: You can swap half the all-purpose flour for whole wheat flour for added fiber.
- Nut Butter Swirl: Instead of a simple butter spread, try using almond or peanut butter for a nutty twist!
- Without Oreos: No Oreos? No problem! Try using chocolate chips, fruit preserves, or even s’mores ingredients like graham crackers and marshmallows!
- For a Vegan Version: Substitute eggs with flax eggs, use vegan butter, and choose plant-based milk for a dairy-free delight.
Let’s Make Those Amazing Rolls!
Ingredients
- 3 ½ cups all-purpose flour
- 2 ¼ tsp active dry yeast (1 packet)
- ½ cup warm milk (110°F / 43°C)
- ⅓ cup granulated sugar
- 1 tsp salt
- 2 large eggs
- ½ cup unsalted butter, softened (plus extra for spreading)
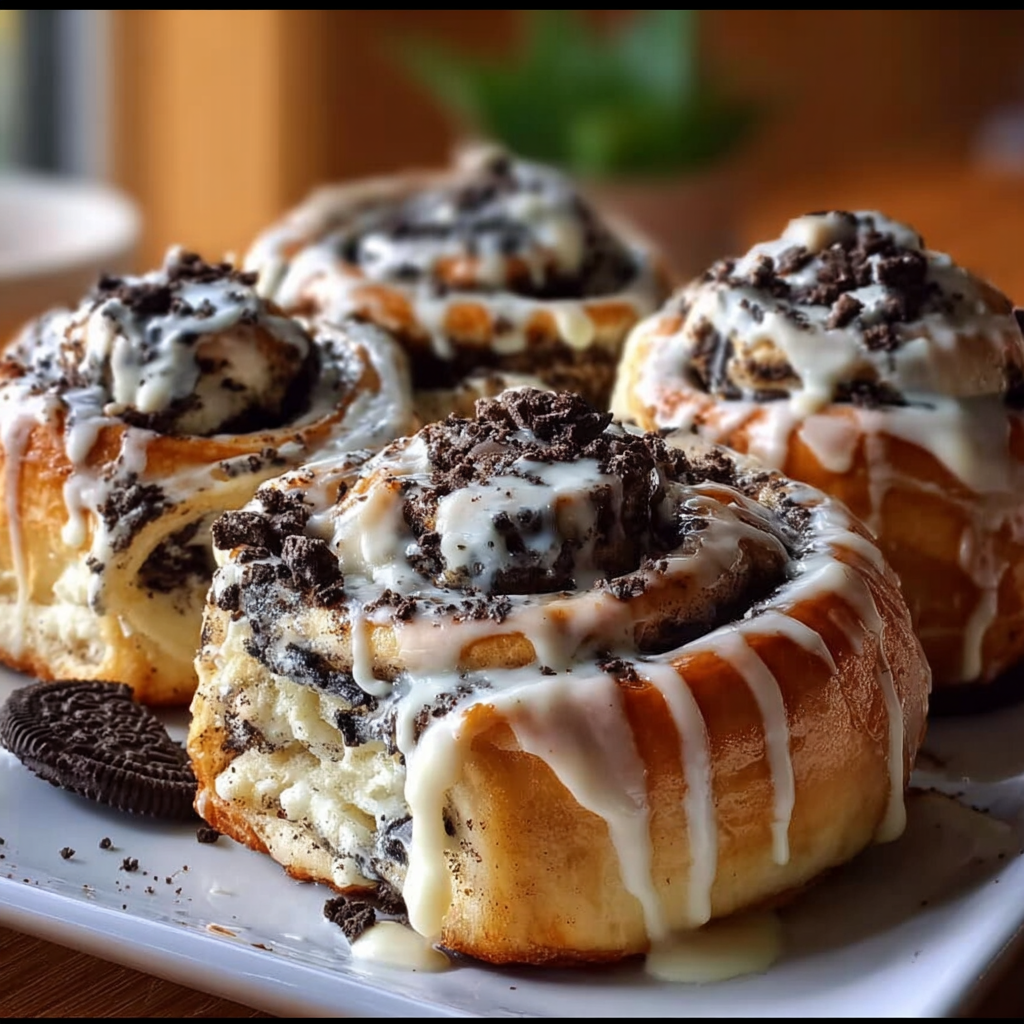
- 15–20 Oreo cookies (standard size, whole)
- Optional: 1 tsp ground cinnamon
For the Glaze
- 4 oz cream cheese (softened) or ¼ cup unsalted butter (softened)
- 1 to 1 ½ cups powdered sugar
- 1 tsp vanilla extract
- 2–3 tbsp milk or cream
- Crushed Oreo cookie crumbs for garnish (optional)
Serves 8–10 people
Standard portions → 8 servings
Slightly smaller portions → up to 10 servings
Step-by-Step Instructions
- Start by combining warm milk, 1 tablespoon of sugar, and the yeast in a small bowl. Give it a gentle stir and let it sit for about 5–10 minutes until it froths—this means your yeast is ready to party!
- Meanwhile, grab a large mixing bowl and whisk together the flour, the remaining sugar, salt, and cinnamon (if you’re using it).
- Add the eggs and softened butter to your yeast mixture, then gradually pour this into the dry ingredients. Get your hands in there or use a stand mixer with a dough hook, and knead the dough for about 8–10 minutes until it’s smooth and elastic.
- Place your dough in a greased bowl, cover it with a clean kitchen towel or plastic wrap, and let it rise in a warm place until it doubles in size (about 1 to 1 ¼ hours).
- Once risen, punch down the dough gently and roll it out on a lightly floured surface into a rectangle about 16×12 inches.
- Spread a thin layer of softened butter on the rolled-out dough. If you like, sprinkle a little more cinnamon and some extra sugar on top for added flavor.
- Now, here comes the fun part! Place the whole Oreo cookies on your dough in a straight line, spacing them so each roll gets a cookie.
- Carefully roll the dough up tightly, starting from the edge with the Oreos. Pinch the seam to seal it nicely.
- Using a sharp knife, cut the log into 12 equal rolls, placing them cut-side up in a greased baking dish, leaving a bit of space for them to rise again.
- Cover the rolls and let them rise for about 30–45 minutes until they’re puffy.
- Preheat your oven to 350°F (175°C) and pop those rolls in for about 20–25 minutes until golden brown and perfectly cooked.
- While they bake, let’s make that yummy glaze! Beat together the cream cheese or butter with the powdered sugar until smooth. Gradually add the vanilla and milk until it reaches a drizzle-able consistency.
- As soon as your rolls come out of the oven, drizzle them generously with the glaze and top with crushed Oreo crumbs if you’re feeling fancy!
- Serve warm, and enjoy every gooey, chocolatey bite!
Handy Tips for Success
- To ensure your rolls stay soft, don’t overbake them. Pull them out as soon as they’re golden!
- If the dough isn’t rising, make sure your yeast is fresh and that your warm milk isn’t too hot, which can kill the yeast.
- Store any leftovers covered at room temperature for 1-2 days. They’re best enjoyed fresh but can also be warmed up!
- If you’re not ready to bake right away, you can prepare the rolls and pop them in the fridge overnight before the second rise. Just let them come to room temperature and rise before baking.
- Experiment with the glaze texture; adding more milk makes it thinner for easy drizzling, while less milk gives you a thicker topping.
Equipment You’ll Need
- A large mixing bowl
- A small bowl for proofing yeast
- A rolling pin for rolling out the dough
- A sharp knife for cutting your rolls
- A greased baking dish or pan
- A whisk and measuring cups for the glaze
- A clean towel (or plastic wrap) for covering your dough
Frequently Asked Questions
- Can I use a bread machine for this recipe? Yes! You can use the dough cycle to mix and knead the dough, then follow the rest of the steps.
- What if I don’t have warm milk? You can substitute with warm water, or use non-dairy milk warmed up; just check the temperature!
- How long do these last? If stored properly, these rolls can stay fresh for 2-3 days. They also freeze well for up to 3 months.
- Can I make these ahead of time? Absolutely! You can prep them the night before and bake them in the morning.
- Can I skip the glaze? Sure! The rolls are tasty on their own, or you can dust with powdered sugar instead!
Final Thoughts
So, are you ready to whip up these unforgettable Oreo stuffed cinnamon rolls? I can’t wait for you to try them! After all, who can resist something so deliciously gooey? If you enjoyed making these or have any creative twists, please share your experiences! I’d love to hear what you think. Don’t forget to follow me on Pinterest for even more fun recipes that bring joy to your kitchen!
