
Spooky Halloween Chocolate and Orange Desserts
Hey there! Are you ready to whip up some deliciously spooky treats for Halloween? I love this time of year—there’s something magical about making desserts that look as fun as they taste. Today, I’m sharing a sensational recipe that’s all about chocolate and orange flavors, guaranteed to impress friends and family. Let’s dive into this festive and easy-to-make treat together!
Benefits of Chocolate and Orange Desserts
Did you know that chocolate can actually provide some health benefits? Dark chocolate, especially, is rich in antioxidants and can be good for your heart! Plus, the zesty addition of orange adds a kick of vitamin C, perfect for staying healthy during those fall months. So you can indulge a little guilt-free when you make these cute desserts!
Fun Variations to Try
- Different Gelatin Flavors: If you want to switch things up, why not try a berry-flavored gelatin instead of orange? It’ll give your dessert a fun new twist!
- Gluten-Free Option: For a gluten-free dessert, simply use a gluten-free chocolate cake mix and ensure that your gelatin doesn’t contain any added ingredients that may contain gluten.
- Add Some Crunch: You could mix in some crushed nuts into the whipped cream or sprinkle them on top for an added crunchy texture!
Ingredients You’ll Need
- 1 chocolate cake (store-bought or homemade)
- 1 cup orange-flavored gelatin or orange Jello
- 2 cups whipped cream (or Cool Whip)
- 1 cup dark chocolate ganache (heavy cream and dark chocolate)
- 1 teaspoon orange zest
- 1/2 cup sugar
- 2 tablespoons water
- Black food coloring (for decoration)
- Edible spider decorations
- Orange slices (for garnish)
- Chocolate cookies (such as Oreos or chocolate wafers)
- Blackberries (for garnish)
- Candy Halloween decorations (if desired)
Serves 6–8 people
Standard portions → 6 servings
Slightly smaller portions → up to 8 servings
Let’s Get Baking! Cooking Instructions
- Prepare the Chocolate Cake: If you’re going for homemade, bake a chocolate cake based on your favorite recipe and let it cool completely. On a time crunch? Go ahead and use a store-bought cake—you’ll need to carefully remove it from its packaging and place it nicely on a serving platter.
- Prepare the Orange Gelatin: In a medium bowl, dissolve the orange gelatin in boiling water following the package instructions. Once it’s fully dissolved, allow it to cool slightly before pouring it over your cooled chocolate cake. Pop it in the fridge for about 1 hour to let that gelatin set beautifully.
- Make the Dark Chocolate Ganache: Place heavy cream in a saucepan and heat it gently until it just starts to simmer—be careful not to boil it! Remove it from heat and stir in the dark chocolate until it melts into a silky smooth ganache! Let this cool and thicken a bit, but not too much.
- Prepare the Whipped Cream: Grab a large mixing bowl and whip that cream until you have stiff peaks! Gently fold in the orange zest for that citrusy kick and set aside.
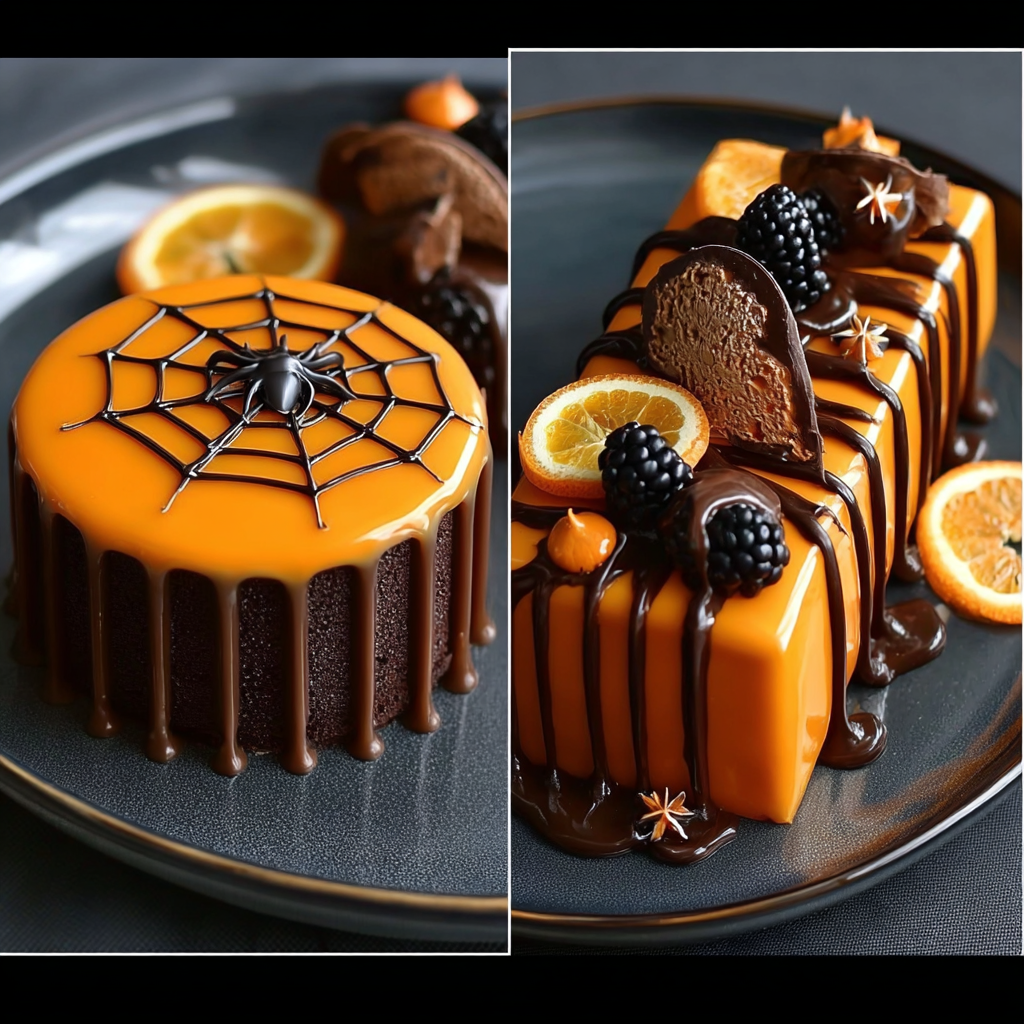
- Decorate the Cake: Once your gelatin is nicely set, it’s time to remove the cake from the fridge. Pour a generous layer of dark chocolate ganache over the top so it can drip down the sides a bit – let’s lean into the spooky look!
- Create the Spider Web: Using black food coloring, draw a cute spider web on the top of the cake. Add in an edible spider decoration to take it to the next level of spookiness.
- Assemble the Orange Dessert: If you’re in the mood for more, take your orange-flavored mixture and layer it in cute clear cups or bowls with whipped cream. Drizzle some ganache over the top and finish with fresh blackberries.
- Final Decoration: It’s all about presentation! Garnish the cake with orange slices, chocolate cookies, and other fun Halloween decorations you have handy.
- Chill and Serve: Pop your decorated dessert back in the fridge for about 30 minutes, to let everything set nicely. When you’re ready, slice the cake and serve it up with any extra chocolate ganache on the side for dipping. Trust me, your guests will love this spooky creation!
Storage Tips
Store any leftovers (if there are any!) in an airtight container in the fridge. These treats are best enjoyed within a few days, but honestly, they’re so good, I doubt they’ll last long!
Equipment Needed
Here’s a list of equipment to help you make these fantastic desserts:
- Mixing bowls for all your ingredients
- A saucepan for the ganache
- A whisk or electric mixer for whipping cream
- A spatula for spreading and pouring
- Cups or bowls for assembling additional layers of dessert
- A serving platter for the cake
Frequently Asked Questions
- Can I use a different flavor of gelatin? Absolutely! Any fruity flavor you like will work, just remember it may change the overall taste balance.
- How can I make this dessert more festive? Use Halloween-themed decorations and edible glitter for a bit of sparkle!
- What if I don’t have dark chocolate? Any chocolate will do! Milk chocolate or even white chocolate can be used for a sweeter touch.
- Can I prepare this dessert in advance? Yes! You can make the chocolate cake and gelatin the day before. Just assemble and decorate on the day of serving.
- How do I know if the gelatin is set? The gelatin should be firm to the touch. If it has a jiggle but doesn’t slosh liquid around, it’s perfect!
Did you try the recipe? I’d love to hear how it turned out for you! Don’t forget to snap a picture and share it on Pinterest to inspire others to create their own spooky treats. Happy Halloween, and enjoy your delicious adventures in the kitchen!
