
Hey there, fellow food lover! Are you ready to dive into a delightful adventure baking some heavenly bomboloni—Italian doughnuts filled with creamy pastry goodness? Trust me, once you taste these soft, fluffy doughnuts, you’ll want to make them again and again. They’re perfect for any occasion whether it’s a cozy weekend brunch or a fun dessert for friends and family. I mean, who can resist a warm doughnut filled with luscious pastry cream? So, let’s get started!
The Magic of Homemade Bomboloni
One of the best parts of making bomboloni at home is the freshness! Not only do you have control over the quality of ingredients, but you’re also creating a delightful treat that your family and friends will rave about. Plus, you can whip these up without any preservatives, making them just a bit healthier for your loved ones. Trust me, the satisfaction you get from biting into a warm bombolone makes it all worthwhile.
Fun Variations to Spice It Up
- Citrus Twist: Add some lemon or orange zest into the dough for a zestier flavor! It pairs beautifully with the sweet pastry cream.
- Chocolate Bomboloni: You can swap half of the pastry cream with chocolate pudding or directly fill them with chocolate hazelnut spread for a delicious twist!
- Spiced Flavor: Adding a pinch of cinnamon or nutmeg to the dough gives it a warm aroma that’s perfect for fall and winter!
Delicious Bomboloni Recipe
Ingredients
- 3 1/2 cups (440g) all-purpose flour
- 2 1/4 tsp (1 packet) active dry yeast
- 1/4 cup (50g) granulated sugar
- 3/4 cup (180ml) warm milk (about 110°F/45°C)
- 2 large eggs
- 1/4 cup (55g) unsalted butter, softened
- 1/2 tsp salt
- 1 tsp vanilla extract (optional)
For the Pastry Cream:
- 2 cups (480ml) whole milk
- 4 large egg yolks
- 2/3 cup (135g) granulated sugar
- 1/4 cup (30g) cornstarch
- 1 tsp vanilla extract or seeds from 1 vanilla bean
- 2 tbsp (30g) unsalted butter (optional)
About 12 medium rolls
Serves 8–12 people (depending on whether each person eats 1 roll or 1–2 slices)
Instructions
- Start by dissolving the yeast and 1 tablespoon of sugar in warm milk in a small bowl. Let it sit for about 5-10 minutes until it’s frothy—this means the yeast is alive and ready!
- In a large mixing bowl, whisk together the flour, remaining sugar, and salt.
- Add the yeast mixture, eggs, softened butter, and vanilla extract to your dry ingredients. Mix it all together, then knead either by hand or with a mixer for about 8-10 minutes until the dough is smooth and elastic.
- Shape the dough into a ball and place it in a greased bowl. Cover it with a clean towel or plastic wrap and let it rise in a warm place until it doubles in size, roughly 1-2 hours.
- While the dough is rising, you can prepare the pastry cream. In a saucepan, heat the milk and vanilla until it’s about to boil, then remove it from the heat.
- In a separate bowl, whisk together egg yolks, sugar, and cornstarch until smooth. Slowly pour the hot milk into the yolk mixture, whisking constantly to prevent scrambling the eggs.
- Return this mixture to the saucepan and cook over medium heat. Keep whisking until it thickens and bubbles, this should just be a few minutes.
- Once thickened, remove from heat and mix in the butter until it’s melted and creamy. Transfer it to a bowl, cover with plastic wrap pressed on the surface to prevent a skin from forming, and chill in the fridge.
- Now back to the dough! Once it has risen, roll it out on a floured surface to about 1/2 inch thick. Cut out rounds about 2.5-3 inches in diameter and place them on a baking sheet lined with parchment paper. Cover and let them rise again for about 30-45 minutes until they’re puffy.
- In a deep pan or fryer, heat vegetable oil to 350°F (175°C). Fry the dough rounds in batches, turning them once, until they’re golden brown all over, about 2-3 minutes each side. Remember—don’t overcrowd the pan!
- Drain the fried doughnuts on paper towels and allow them to cool slightly.
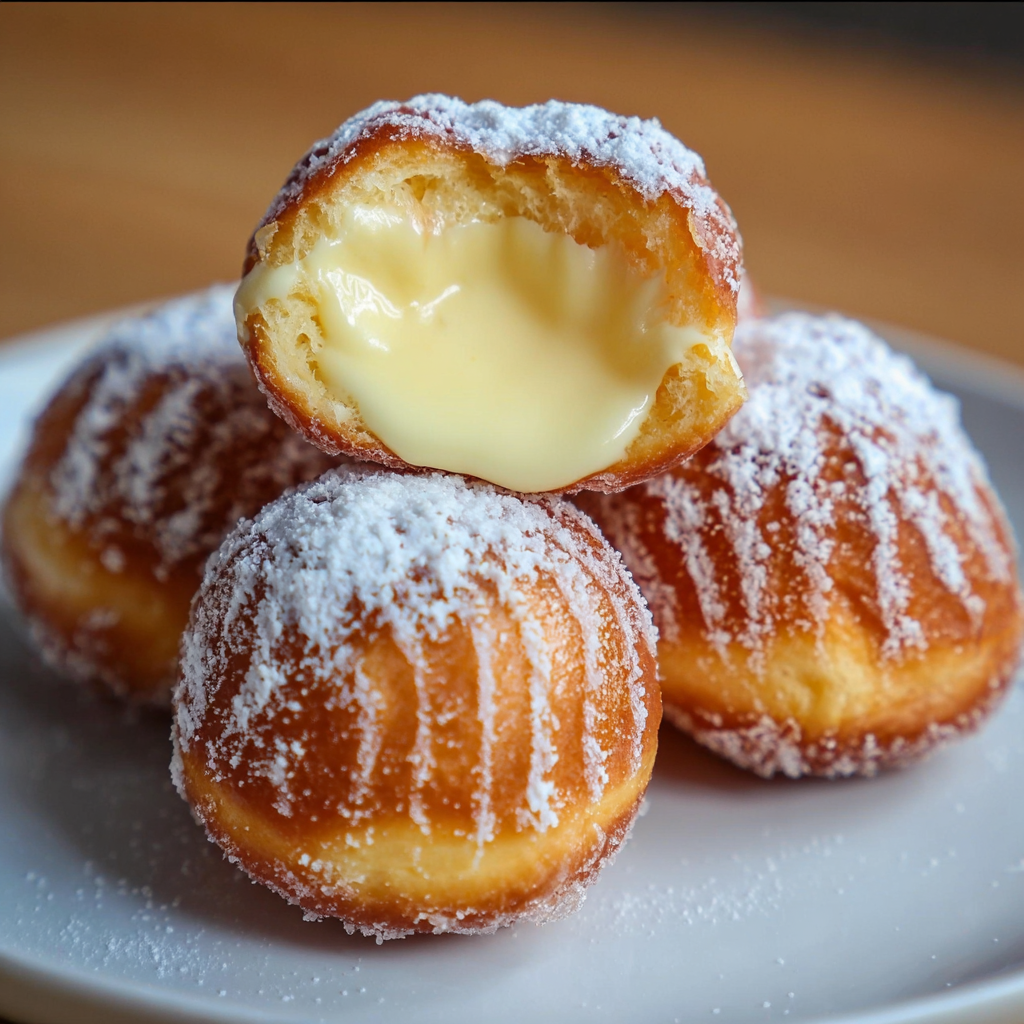
- Once they’re cool, fit a piping bag with a small round tip, fill it with the chilled pastry cream, and carefully insert the tip into the side of each doughnut to fill them until they feel plump and a bit of cream oozes out.
- Generously dust the filled bomboloni with powdered sugar, and they are ready to enjoy!
Practical Tips
- If you want to create a light and airy dough, make sure to knead it well—this helps develop gluten!
- Store any leftovers in an airtight container, but let them sit for no more than a day as they are best served fresh!
- When frying, don’t keep the temperature too high to avoid the outside cooking faster than the inside.
Equipment Needed
Here’s what you’ll need for this delightful adventure:
- A large mixing bowl for beating and combining ingredients
- A deep pan or fryer for frying the bomboloni
- A rolling pin for rolling out the dough
- A sharp cutter, about 2.5-3 inches in diameter for cutting the dough
- A whisk for mixing pastry cream
- A piping bag with a small round tip for filling the doughnuts
- Paper towels for draining
Frequently Asked Questions
- How do I know if my yeast is active? Look for a frothy layer on top after letting it sit! If it looks like that, you’re good to go!
- Can I use whole eggs instead of just yolks for the pastry cream? It’s best to stick with egg yolks for that rich creaminess, but you could experiment if you want!
- Can bomboloni be frozen? Yes! You can freeze unfilled, cooled bomboloni for about a month. Just thaw them before filling!
- What’s the best way to refill them with cream? Be gentle when inserting the tip into the doughnut; you want enough cream inside, but avoid bursting it.
- Can I make bomboloni without frying? Yes! You can try baking them for a healthier version, but they won’t have the same crispy texture.
Are you excited to make your own bomboloni? I can’t wait to hear how they turn out for you! Please share your baking joy with me on Pinterest or drop a comment here with your thoughts and any fun variations you tried. Let’s keep spreading the love of baking together!
